I tried pretzels (Bretzeln) for the first time a few months ago, while travelling in Germany with husband. We grabbed a couple of sandwiches made from pretzels from a small food counter in the Nürnberg train station...it was love at first bite. The surface was salty and crisp, the bready center was soft and yummy and delicious. I knew once we returned to Canada that I would have to try making them - the first time, we ate them all on the very same night, every single last one. Sooooo gooooood.
U
 |
| Nürnberg |
 Making Bretzeln is a little time-consuming, so it's a good weekend baking task to do between other chores. Well worth the effort, you won't be disappointed!
Makes 10 large pretzels.
1.5 tsp instant yeast
1 Tbsp malt powder or sugar
3.5 cups of white flour
1.5 tsp salt
1.5 cups warm milk of choice
2 tsp olive oil
1-2 tsp coarse salt, for sprinkling
Put the yeast, sugar, 2 cups of flour, salt and warm milk in a large bowl. Use an electric mixer to work the dough, mix for about 2-3 minutes to activate the yeast. Clean off the beaters, and work with a wooden spoon to mix in the remaining flour. Turn out on to a clean surface dusted with flour. Knead for 4-5 minutes, and shape into a ball.
Drizzle the oil into a clean mixing bowl, and spread it around the bottom and sides. Place the dough ball into the bowl, and pat the top with the oil on your fingers to cover the exposed surface - this prevents the dough from drying out while it rises. Place in a warm spot for about an hour, or until doubled in size.
 Turn out the dough on to a clean floured surface, and knead for 1 minute. Cut the dough into 10 equal parts. With your hands, roll each piece of dough back and forth so that it forms a long rope about the thickness of your index finger. To keep things authentic, leave the middle of the rope a bit thicker, this will form a 'Bauch' (belly) at the bottom of the pretzel once formed. Allow the dough to relax for 5 minutes - use the time to start a large pot of water to boil, and to turn your oven on to 425 degrees.
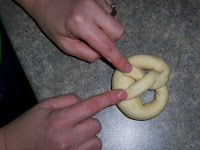
Shaping the pretzels is simple. Place one of the ropes in front of you, take each end in one hand, and bring them together and twist once. Lay the ends down on the 'belly' of the rope, using a bit of water and pressure to make the ends stick. Cut across the belly with a sharp knife.
 To boil the pretzels, place a pretzel on a spatula and lower into the boiling water. Use the spatula to push the pretzel under the water, and hold it there for exactly 20 seconds. Lift the pretzel out of the water, and allow any excess water to drain off. Place on your prepared baking sheet and sprinkle with salt while the surface is still wet. It's best to boil the pretzels one at a time.
Bake for 12-15 minutes, or until nice and browned on top. Enjoy!
Per Bretzel: 184 cals, 2g fat, 36g carbs, 350mg sodium, 15g fiber, 5g protein. (PRO12%,CHO80%,FAT8%)


