Monday, July 11, 2011

Spicy Hickory Maple Seitan Bacon


Those of you who know me, know my take on faux meats. Aside from a torrid love affair with commercially-made faux chicken nuggets (oh my pretties how I long to smother you in hot sauce), I don't try especially hard to mimic the real thing - I'm more concerned with the experience of food. I miss sausages because my Dad used to cart home pounds of freshly made Hungarian kolbasz and hurka...stuffed in a suitcase for the flight home from Montreal to the Maritimes, I kid you not. It was passed around the table as something special, something we ate together. I miss ground beef because I miss burgers on the grill, not because I long for the flavor of cow. Hey, that`s just me, you do what you want. So when it comes to working with meat alternatives, yes, I do try to mimic the flavor to some extent - but let`s face it, nothing about wheat gluten could fool a carnivore into thinking it`s meat. Enjoy it for what it is; a high-protein, versatile addition to your cooking repertoire. And for those of us vegheads out there, it`s a way to connect with foods and experiences we long to recreate.

All to say, I`ve recently stumbled across several faux bacon recipes, and was intrigued by the unique pairing of red and white doughs to recreated the marbled effect of bacon. Hmmm...culinary challenge indeed. In creating this version, I decided to bypass the technique of blending in pre-prepared soy bacon bits for added flavoring. Really...blech if you ask me. I`m sure it tastes more like bacon, but I think we can do better than artificial bacon flavor additives. I decided to focus on the flavors of maple syrup for a little sweetness and pureed chipotle peppers for its rich smoky flavor and deep red color.

If you don`t care to follow the steps to make it look similar to bacon, mix everything in a bowl and carry on. Otherwise, check out this creative take on veg bacon. And when it`s done, go nuts...fry slices in a skillet or chop it into cubes and bake in the oven (think salad topping). I`m hungry all over again.

Makes a 19 oz loaf, approx 24 slices.

In seperate bowls, mix the following dry ingredients:

red dough                              white dough
1 cup vital wheat gluten        1/2 cup vital wheat gluten
1/4 cup soy flour                   1 Tbsp soy flour
1 Tbsp garlic powder              1 1/2 tsp garlic powder
1 tsp onion powder     
1 Tbsp smoked paprika
1/2 tsp black pepper
1 tsp salt

In seperate bowls, mix the following wet ingredients:

red dough                       white dough
2/3 cup cold water         1/2 cup + 1 Tbsp cold water
1 Tbsp olive oil               1 tsp olive oil
1-3 chipotle peppers
     (pureed and try to remove seeds)
2 Tbsp maple syrup
1 Tbsp tomato paste
1 tsp liquid smoke

Mix together the white dough wet and dry ingredients, and knead for 2-3 minutes. Dust a clean surface with wheat gluten, and roll out the dough. Now do the same for the red dough.

Here's where you get to be creative. Layer the red and white doughs, cut them into pieces if necessary. In the bacon pictured, I alternated 3 layers of red with 2 layers of white. I used the final layer to cover the entire loaf.

Place a sheet of foil on a baking tray, and cover liberally with cooking spray. Place your bacon on the tray, and cover with another sheet of sprayed foil, oiled side facing the bacon. Place a plate or cutting board on top, and carefully balance something heavy on it - I used 2 heavy jars of peanut butter. Allow to sit for 30 minutes.

Remove your weight and cutting board, and bake in a 315 degree oven for 45 minutes. It may appear slightly underdone, and 'give' to the touch, but that's ok, you'll be frying up the slices later. Remove your foil for the last 15 minutes of baking, but be sure the top doesn't get too brown. Cool, then slice! If freezing, cover in plastic wrap and put in a freezer baggie.

Note: if you decide to omit the chipotles and black pepper to cut out the spice, replace with 1-2 Tbsp of water or tomato paste. Best used fried or baked - if used in a dish with a sauce, baked seitan will absorb too much liquid and be a bit smooshy...you could try adding at the last minute, but a smoky tofu-based 'bacon' would be best. Recipe to come  :-)

Per 2 slices: 83 cals, 2g fat, 5g carbs, 211mg sodium, 0g fiber, 11g protein.  (PRO44.8/54%,CHO20.1/24%,FAT18.5/22%)

Sunday, July 10, 2011

Chipotle Chili Bowl

This makes a rather large pot, but freezes well. Chipotle peppers are jalapeno peppers, roasted - look for canned chipotles in adobo sauce in the mexican section of your grocery store. They keep forever in the fridge, but you can freeze what`s left if your fridge is as full as mine. Husband, no comment please. Adjust the seasonings as you see fit, I like my chili spicy but cut back as needed. mmmmm...love chili.

Makes about 11 x 1 cup servings.


1 Tbsp olive oil
1 green pepper, finely minced
1 large onion, finely minced
2 cups mushrooms, roughly chopped
1-2 Tbsp ground cumin
1-2 Tbsp chili powder
1-3 chipotle chilies in adobo sauce, minced
4 1/2 cups well-cooked beans (try a mix of black and pinto)
1 x 796ml/28 fl oz tin tomato pieces
1 x 796ml/28 fl oz tin crushed tomatoes
1 Tbsp garlic powder
1/2 cup TVP
1 cube faux beef bouillon

Heat the olive oil in a large stock pot. Add the vegetable and saute for 5-10 mins on medium heat, until cooked through and lightly browned. Add cumin and chili powders, and continue stirring until spices are fragrant. Add chipotles, beans, tomatoes and garlic powder. 


In a separate pot, heat 3/4 cup water and the bouillon cube to boil. Add TVP, remove from heat and let sit until water is absorbed. Add TVP to chili.

Cover the stock pot, reduce the heat until just simmering. Check on the chili every 5-10 min, giving it a good stir so nothing sticks to the bottom. I typically leave it to simmer for about 45-60 mins, but if you're in a rush 20 mins will do.

Note: adjust cumin, chili and chipotles as you see fit. I like my chili spicy and flavourful, it needs to burn going down baby! Having said that, I like to eat it with toasted buttered buns, I find the bread helps cut the heat just enough...and cheese, definitely cheese. Another idea is to pan-fry some potatoes, throw them in a tortilla with a scoop of the chili, top with sour cream and voila! Chili pocket on the run!

Vegan or lactose intolerant? No prob, check out the hippie section of larger grocery stores or your local health food store, vegan soy sour cream and cheeses are aplenty. A little pricey to use every day, but nice as a treat...

Per 1 cup: 172 cals, 2g fat, 30g carbs, 342mg sodium, 9g fiber, 11g protein.  (PRO37/21%,CHO118/69%,FAT17.5/10%)

Thursday, July 7, 2011

Toltott Kaposzta - Hungarian Stuffed Cabbage

There is nothing like the smell of yummy cabbage rolls simmering on the stove! This is my vegan adaptation of the Hungarian classic, with a filling of seitan, TVP and rices. Bears a decent resemblance to the original, really hit the spot! Thicken the sauce with soy sour cream if desired, but not necessary... 

Makes 13 cabbage rolls, with 1/3 cup filling each.


1 large head green cabbage

Put on a pot of water to boil - use a pot large enough to hold the head of cabbage. Place the cabbage on a cutting board, and with a small sharp knife cut out the core. Put the cabbage in the boiling water, and turn occasionaly as needed. As the outer layers of the cabbage cook through, gently peel them off and remove from the water - be careful not to burn your fingers, use tongs or a large spoon! Put aside the cabbage leaves to cool, while finishing remaining layers go ahead and make the filling.

Filling
 
1/4 cup raw long grain brown rice + 3/4 cup water to boil
1/2 cup raw short grain calrose rice + 1 cup water & 1 cup tomato juice to boil
1 cup water
2 faux beef bouillon cube
1 tsp soy sauce
1 tsp liquid hickory smoke
1 cup TVP granules


1 1/2 tsp olive oil
3/4 cup minced or grated onions
4 cloves garlic, pressed
1 Tbsp garlic or onion powder
2 Tbsp sweet Hungarian paprika
2 tsp hot Hungarian paprika
1 tsp ground black pepper


1 1/2 cups vital wheat gluten


Cook the 2 rices seperately, and make sure the grains are very plump - almost overcooked. Keep in mind, unlike traditional meat cabbage rolls, the rice will not cook any further once mixed into the seitan. The calrose rice might need a little extra water here and there, and will look like a large glutinous mess once completely cooked (this is a good thing, helps bind together the other ingredients). Just make sure the bottom doesn't scorch, simmer gently and keep an eye on it.
 
While the rice is cooking, bring the water, bouillon, soy sauce and liquid smoke to a boil. Add in the TVP, stir, remove from heat and allow the mixture to sit long enough to absorb the water. Fry the onion in oil until well cooked, add in the rices, TVP and remaining seasonings. Stir well to combine, and put aside. Once the mixture is cooled completely, stir in the gluten. The mixture will appear dry - resist the temptation to add liquid! Just keep stirring until it starts to bind together.
You're ready to start stuffing your cabbage! Take a scoop of filling, I use about 1/3 cup, and knead the filling in your hands until the gluten is well worked in and firms up a little. Flatten the ball into a flat oval, and place on your cabbage leaf. Bring the bottom up over the filling, fold over the left side and then the right. Now pull the top over, and use toothpicks to keep in place (see pics). Finish stuffing the remaining cabbage leaves until the remaining of the filling is used up. If you have any remaining cabbage, slice it up into thin pieces.

1 large tin tomato juice
1 each faux beef and faux chicken bouillon cube
1 1/2 cup sauerkraut

Take a large pot, and layer some of the leftover cabbage and sauerkraut on the bottom. Add several of the cabbage rolls. Continue layering until the cabbage slices, sauerkraut and cabbage rolls are all used up. Disolve the bouillon cubes in a little water, and pour into pot along with tomato juice. Add enough water to cover cabbage rolls. Cover and let simmer for about 45 minutes. Turn heat off. Serve as is, or remove cabbage rolls to a seperate dish if using the sour cream to thicken the sauce.

3/4 cup sour cream, optional

If using sour cream, it must be 'tempered' before adding to the pot of hot tomato sauce so that it doesn't seperate. Gently stir in a few spoonfuls of sauce into the sour cream. Once blended, add a few more tablespoons, and a few more until the sour cream is soupy and warmed up. Pout into pot, stirring quickly. Warm gently, do not boil.

When ready to serve, ladle a large spoonful of sauce on to a plate and top with a couple of the cabbage rolls. Yum!!!


Per roll: 219 cals, 6g fat, 25g carbs, 587mg sodium, 6g fiber, 17g protein.  (PRO65.8/30%,CHO101/46%,FAT52.4/24%)

Tuesday, June 14, 2011

Black Bean Soba Noodles with Mushrooms & Cabbage

Exhausted after my first day back in the pool since the bout of tonsilitis, I came home looking for a simple meal. I've been eyeing a recipe from BBC's Good Food 'Vegetarian Christmas 2010' edition, here's my adaptation - black bean sauce is a little salty, but paired with the cabbage and mushrooms was quite a yummy meal...  

Makes 4 generous servings.


450g package of firm or extra-firm tofu
1-2 cloves garlic, pressed 
       (omit if the garlic in the sauce is enough for your taste)
2" piece of ginger, minced
3 cups quartered cremini mushrooms
5 cups shredded Savoy cabbage
300g soba noodles (enough for 4 people)
6 Tbsp black bean garlic sauce
2 Tbsp olive oil, divided
5 green spring onions, sliced and divided

Cut tofu in 1/2" cubes, and toss with 2 Tbsp of the black bean sauce. Allow to marinate while preparing veggies, longer if you have time. Over medium heat, add 1 Tbsp of the oil in a non-stick frying pan and fry the tofu on all sides until nicely browned. Remove from pan and set aside. Add remaining 1 Tbsp oil, and sautee the garlic and ginger for 30 seconds, then add the mushrooms and cabbage. Toss the veggie mixture every minute or so, adding a sprinkle of water if the bottom of the frying pan begins to scorch. Nibble on the cabbage every so often, until you're happy with the tenderness - I happen to like it rather crunchy.

Heat a pot of water, and boil noodles according to package directions. In the meantime, add the remainder of the black bean sauce to the frying pan and the majority of the spring onions, keeping just enough aside as a garnish for each serving. Add tofu back into pan, and sautee for another minute, tossing as needed to prevent veggies from sticking to the bottom. Drain the cooked noodles, add to frying pan, tossing to blend everything together. Divide into 4 bowls, garnish with remaining spring onions, and serve!

Per serving: 497 cals, 14g fat, 73g carbs, 1744mg sodium, 6g fiber, 28g protein.  (PRO98.4/20%,CHO270/54%,FAT129/26%)

Sunday, June 12, 2011

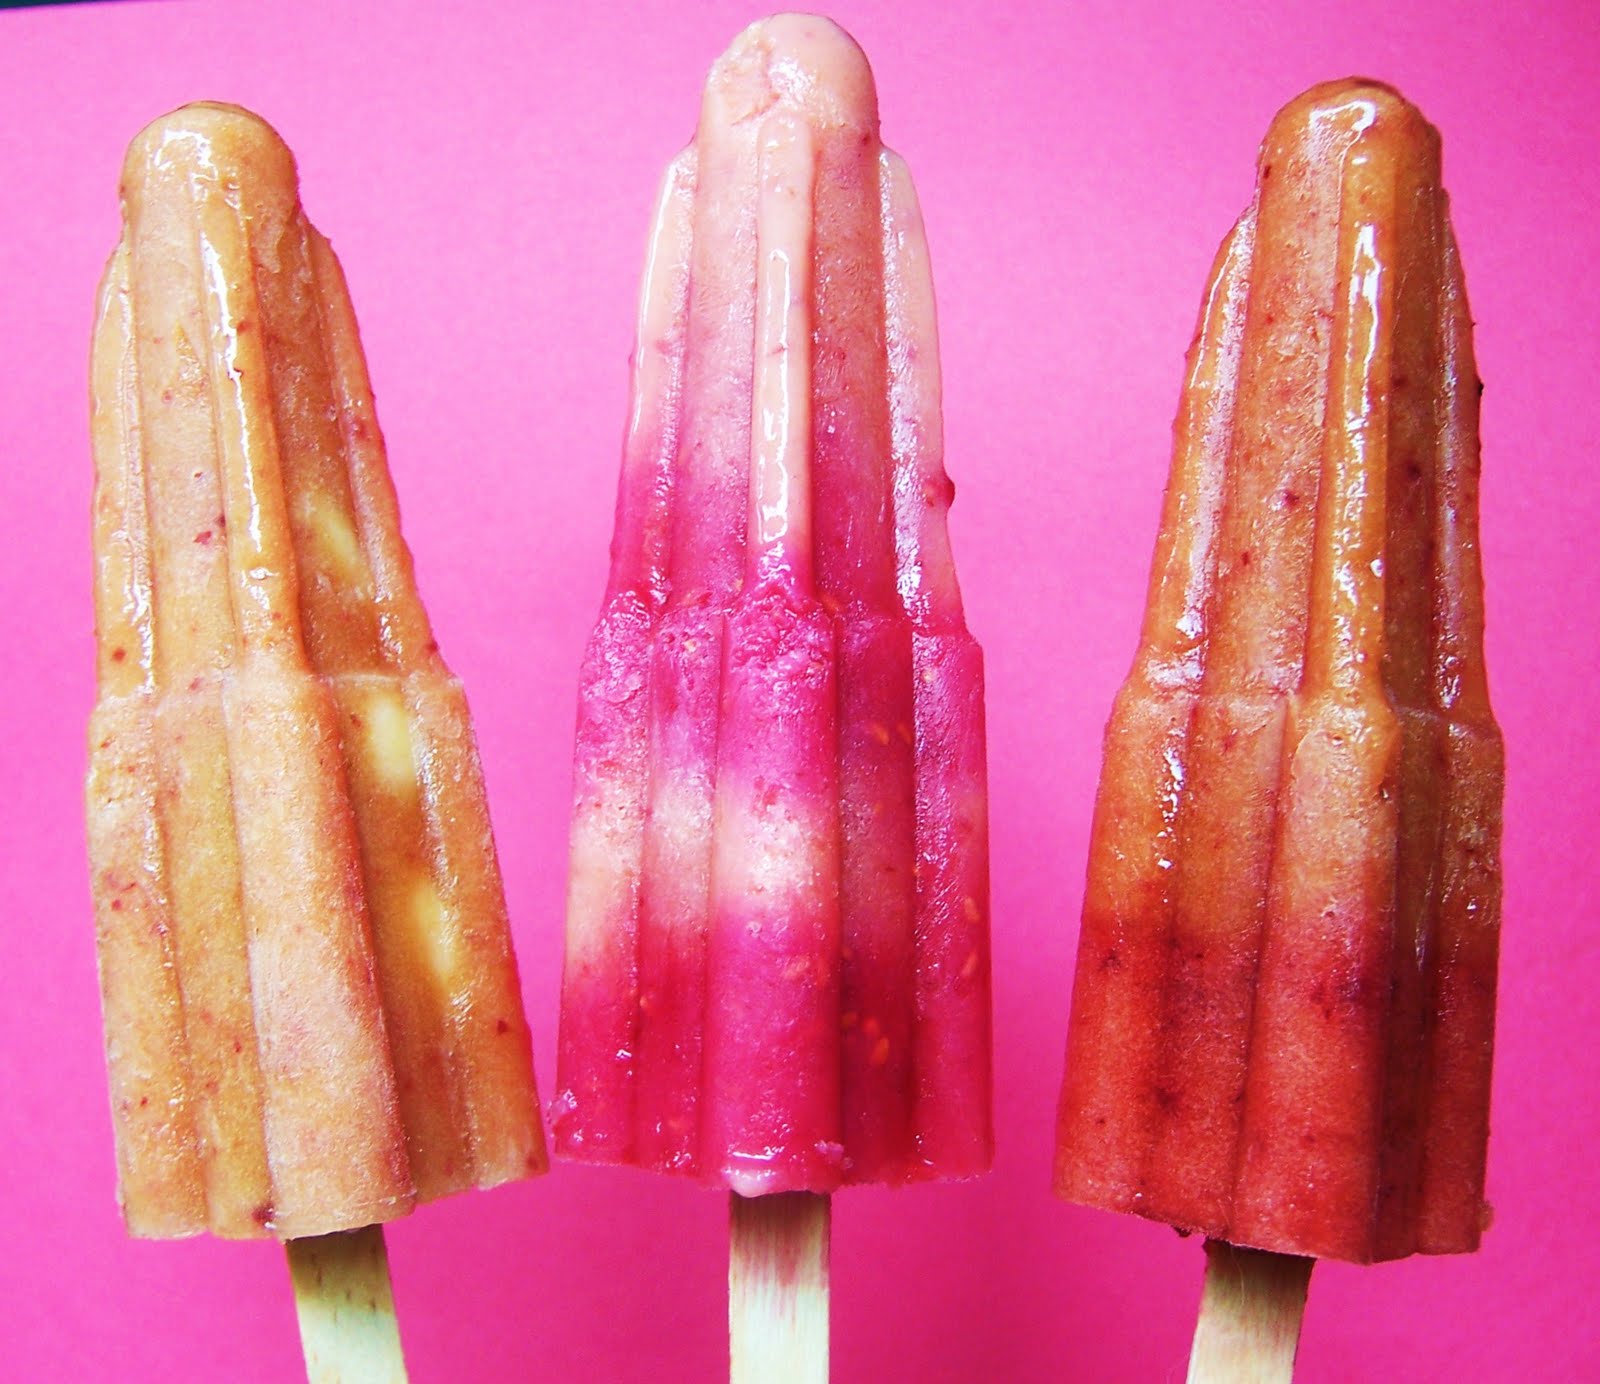
Peach Popsicles, 4 ways


Left to right:
peach banana juice pop,
peach raspberry creamsicle,
peach plum icecicle.

Below,
peach blueberry
vodka icecicle.


What better way to celebrate summer than with homemade popsicles?!? In my extensive experience with frozen treats, popsicles come in 3 types of base ingredients; water, juice, or a creamy mixture of some kind. Here, the mighty peach is celebrated in all 3 types, along with a special fourth option - the addition of alcohol. See that little stripped popsicle, the one whose end broke off because I was too impatient to let it freeze properly? He's laced with blueberry vodka. Thought that would get your attention...

The best thing about making these yourself is that you can control the sugar, and subsequently unnecessary calories. Be wary of store-bought and even do-it-yourself recipes that call for juice concentrate, but little liquid to dilute it with. Talk about sugar overload, no wonder they taste great. The popsicle recipes here use simple syrup, and you can add as much or as little as you like. Try using the recommended amount - it may not seem like much, but the flavour of the fruit will take centre stage once frozen. And please, be more patient than little me, let them freeze for several hours before you remove them!

Each recipe makes 6-8 popsicles, depending of size of moulds.

Simple syrup - used in all 4 recipes
3/4 cup water
1/2 cup sugar
Bring water and sugar to boil for 5 minutes, or until it coats the back of a spoon like maple syrup. Let cool before using, refrigerate whatever is left.


Instructions for each of the recipes below are the same. Chop the fruit into small pieces, I don't bother peeling the peaches/plums. Frozen or canned fruit would probably do just fine if you don't have fresh. Puree the ingredients in the recipe for 1 minute, either all ingredients together or puree each fruit in the recipe seperately. Add more water/juice as necessary, but just enough to get the ingredients in the blender whirling. Pour carefully into the moulds, and freeze for several hours. If you decide to puree the fruits seperately, you can then swirl or layer them in the mould to create interesting patterns as in the photo above. If layering, allow each layer to freeze up a bit before adding the next one. If you have any trouble removing them from the mould, run under warm water to melt the edges of the popsicle a little. The peach blueberry vodka icecicle doesn't freeze up as hard due to the alcohol, so I recommend chosing a mould without an intricate design - it was really hard to remove them without breaking each one!

Peach Plum Icecicles (water-based)
4 peaches + 2 Tbsp simple syrup
2 plums  + 1 Tbsp simple syrup
add a little water to blend as needed

Peach Banana Juice Pops (juice-based)
4 peaches + 2 Tbsp simple syrup
1 banana + 1/4 cup orange juice
add a litte water to blend as needed

Peach Raspberry Creamsicles (yogurt-based)
3 peaches + 1.5 Tbsp simple syrup + 1/2 cup vanilla yogurt
1 cup raspberries + 1 Tbsp simple syrup
add a little water as needed

Peach Blueberry Vodka Icecicles (water based)
3 peaches + 1.5 Tbsp simple syrup
1 cup blueberries + 3 ounces of bluebery vodka, add a little water as needed


For complete recipe
(divide by number of popsicles)

Peach Plum: 411 cals, 2g fat, 104g carbs, 0mg sodium, 11g fiber, 6g protein.
Peach Banana: 446 cals, 2g fat, 113g carbs, 4mg sodium, 12g fiber, 7g protein. 
Peach Raspberry: 415 cals, 3g fat, 91g carbs, 58mg sodium, 15g fiber, 10g protein. 
Peach Blueberry: 584 cals, 2g fat, 100g carbs, 2mg sodium, 10g fiber, 5g protein. 

Friday, June 10, 2011

Lemon Dream Cupcakes

Friday is treat night = I heart cuppie cakes. This is my adaptation of the basic vanilla cupcake from 'Vegan Cupcakes Take Over The World', great book! I cut back on the sugar and margarine to make them, ahem, healthier. Also, I used whole grain spelt flour, makes for a dense cupcake but there were nooooo complaints here...

Makes 12 small or 8 medium cupcakes.


Be warned, these cupcakes are not terribly sweet so double the sugar and stick to white flour if you're looking for something a little more traditional. Keep in mind that icing will add to the sensation of sweetness. I cut back on the sugar intentionaly, you know, so I could have my cake and eat it too...

3/4 cup milk of choice
1 tsp apple cider vinegar
1/4 cup sugar of choice (try succanat)
1 tsp vanilla
1/4 cup margarine, melted and cooled
1 1/4 cups flour of choice (used spelt today)
1 Tbsp cornstarch
3/4 tsp baking powder
1/2 tsp baking soda
1/4 tsp salt
1 large lemon, peel grated and then juiced
few drops lemon essence, if desired

Heat oven to 350 degrees. Spray a muffin pan or line with muffin cups. Mix milk and apple cider vinegar in a large bowl, and allow to sit for a few minutes to curdle. Curdle, you ask? Yep, this is the equivalent of buttermilk...works especially well with soymilk, as it thickens quite a bit. Add sugar, vanilla, lemon juice, 1/2 the lemon peel and lemon essence if using. Stir in the melted margarine, but ensure it has cooled beforehand or it 'cook' your milk. In a measuring cup, mix your flour, cornstarch, baking soda and powder, and salt. Whisk your flour into your wet ingredients, ensuring all lumps are gone. Pour batter into muffin pan, and tap bottom of pan on counter to ensure bubbles rise to the top. Bake for 15-20 minutes, or until a toothpick to the middle of the cupcake comes out clean. Let sit for a few minutes, and then remove from pan and cool on wire rack.

Once completely cooled, ice those puppies! I like to buy prepared icing - there are several vegan varieties already on the shelf in your local grocery store, and it really simplifies things when you're in a hurry. For this recipe, I mix 1/2 cup vanilla icing, the remaining lemon peel, a few drop of yellow food coloring and lemon essence.

Yummers!

Per cupcake un-iced, if making 8: 139 cals, 5g fat, 22g carbs, 187mg sodium, 2g fiber, 3g protein.  (PRO9%,CHO59%,FAT32%)

Per cupcake un-iced, if making 12: 92 cals, 3g fat, 15g carbs, 125mg sodium, 2g fiber, 2g protein.  (PRO9%,CHO59%,FAT32%)

Wednesday, June 8, 2011

Whole Grain Pizza Crust

This is my go-to recipe for pizza crust. The extra 'flavor mix' of fresh garlic, spices and herbs in the dough makes for a really flavorful crust. Yum!

Makes enough dough for 10 slices.
 

1/4 cup milk of choice
1/4 tsp sweetener of choice
1 Tbsp baker's yeast
3 cups flour of choice
    (try 1 cup spelt, 2 cups whole wheat)
1 cup warm water, more as needed

flavor mix: gather up your favorite herbs, spices or anything else you'd like to add to the dough. Try 1-2 cloves of garlic (minced or pressed), 1 tsp chili pepper flakes, 1 tsp oregano, 1 tbsp whole flax seeds. Yum!

Heat oven at the lowest temperature possible, until the oven is just warm but not hot. Turn heat off. Warm milk in a small pot, stir in sugar and sprinkle yeast over top. Let yeast sit for 5-10 minutes until bubbly and frothy. In the meantime, put flour and flavor mix into a large bowl. When yeast is ready, stir it into the flour, and add enough water to make a soft dough.

Turn dough on to floured surface and knead 4-5 minutes until elastic and smooth. Clean your large bowl, dry it and grease it with the oil. Roll the ball of dough in the oil until lightly coated all over. Cover with a clean towel and place in the warm oven for 45-60 minutes, or until double in size.

Once risen, punch down dough and turn it out of the bowl back on to your floured surface. Knead a couple of times, and then roll out to roughly the size of your piza pan. Spray the pan with oil spray, and lay the dough on the pan. Press it out to cover the bottom of the pan with your fingers. Heat oven to 400 degrees.

Cover the dough with your favorite toppings, and bake for 15-20 minutes or until toppings are heated and crusted is lightly browned around the edges. Enjoy!

Per slice, dough only: 128 cals, 1g fat, 26g carbs, 4mg sodium, 4g fiber, 5g protein.  (PRO14%,CHO78%,FAT8%)

Sunday, June 5, 2011

Potato Chorizo Breakfast Hash

I'm been sick this week, and looking for comfort foods to make me feel better. My tummy, at least. Breakfast hash is just a mix of yummy things baked up in the oven. In this version, I use my vegan chorizo sausage and a sprinkle of smoked paprika, so spicy and warm and tasty! Serve as a side with other breakfast dishes, also makes a great lazy lunch or dinner. If keeping the recipe vegan, you can use a vegan cheese or make it without, it's great either way...

Makes 4 servings.


4 medium potatoes (about 600g)
1/2 cup minced onions
1 large green or red pepper, chopped
1 cup grape tomatoes, halved
1 seitan chorizo sausage, halved lengthwise and thinly sliced
smoked paprika, pepper, salt to taste
2 oz cheese of choice, shredded (about 1" x 4")
    (Daiya is vegan, haven't tried it but heard it was pretty good) 

Heat your oven to 425 degrees. Spray a ceramic or glass casserole dish. Scrub your potatoes well under running water, and pierce the skins a few times with a fork. Microwave for 4-5 minutes, or until a knife slides through easily to the middle of the potato. Let cool for a few minutes, and cut into large chunks - careful, the blast of steam when you cut into them will be hot! Put your potatoes into the casserole dish, and layer in the chorizo, onions, peppers and tomatoes. Sprinkle with the paprika, pepper and salt to taste. Sprinkle with cheese, if using. Bake for 10-15 minutes or until potatoes and chorizo are little browned.

Note on cheeses: generally, I avoid dairy where possible, but finding a truly veg cheese option is hard. Even dairy-free ones usually have rennet, which is an animal product. Vegan cheeses are pricey, so I try them sometimes to experiment, but I don't see making them a regular part of my diet. Most dishes taste great with the cheese left out altogether, and if you divert your attention to spices and textures instead, you'll find your tummy happily occupied by the experience of flavors rather that what's "missing" from the dish...  

Per serving: 207 cals, 5g fat, 33g carbs, 113mg sodium, 5g fiber, 9g protein.  (PRO15%,CHO62%,FAT23%)

Saturday, June 4, 2011

Product Review!

Mimiccreme is a non-dairy, almond and cashew-based cream alternative. I came across their line of products in one our local health food stores, and indulged in the hazelnut biscotti coffee creamer ($4.49/473ml) as well as the unsweetened creamer ($6.29/946ml) for cooking with.

My thoughts on the coffee creamer: pretty good. Considering price per volume, it's actually not much more expensive than other soy-based or even dairy coffee creamers. And it's less sweet than flavored coffee creamers, although I still have to cut it with a little plain soy coffee creamer - I don't like my coffee too sweet. Don't be put off by how thick it is, the creamer blends into coffee quite well. If you leave your coffee sitting for a bit like I sometimes do, it settles a little on the bottom, but blends right back up if you give it a stir!

I have yet to try the unsweetened creamer bought to cook with, although I suspect the consistency is going to produce very nice results. What I do like about these products is at least they offer unsweetened options. I don't indulge in packaged goods too often, but when I do buy something special I want the flexibility to choose unsweetened so that I have control over the quantity of sugar in my recipes. All in all, I would buy these products again. Stock up on a few when you can, and use them for recipes where you need to add some kind of cream alternative. For best value, plan out a few meals that will use up the whole container rather than having it spoil in the fridge.

Check it out! Go to Mimiccreme website...

Hungarian Zebratorta - chocolate banana zebra cake

I stumbled across Zebratorta while researching Hungarian foods, and was intrigued by the unique design of white and chocolate "zebra stripes" pattern in the cake batter. In my version of this recipe, I veganized it by using bananas in place of eggs. Not traditional, I know, but it really did the trick! Zebratorta is relatively simple to make, and delectable.
...mmmm...cake


Makes 12 servings. Unless of course you love cake, and then you'll probably eat 2-3 servings at once, like I did. For breakfast.

There are several versions of this recipe, some baked directly in the pan and some baked into a sweet crust, kind of like an open-faced pie. I'm trying to limit extra fat and calories - yes, I realize this is a post for cake, but a girl can't survive on veggies alone - so I opted for a simple recipe baked directly in the cake tin. Here's where things got tricky...cutting back on fat in Hungarian cooking and baking is questionable. Well, my grandmother would certainly question it. Fat, after all, is flavor. And, the original recipe called for 5 eggs, seperated so the whites could be beaten to fluffy peaks. Replicating the texture while also cutting back on oil was a challenge, but I think the results were quite successful!

2 large bananas
1 1/2 cups icing sugar
1 1/2 cups milk of choice
1/3 cup vegetable oil
1 tsp vanilla
2 3/4 tsp baking powder
1 2/3 cups flour
1/4 cup cocoa

Heat oven to 360 degrees, and grease and flour a round baking tin, removable bottom if possible (but not necessary). Mash bananas in a mixing bowl, add sugar, milk, vanilla and oil. Blend with handmixer or whisk vigorously for 2-3 minutes to emulsify the oil. In a seperate bowl, mix flour and baking powder. Add liquid to dry ingredients, and blend well enough to ensure lumps are removed. Pour 1/2 of the batter back into the other bowl. Add cocoa to one of the bowls, and again blend well enough to ensure batter is smooth.

Now you're ready to start creating your zebra pattern in the baking tin! It's very simple. Using large spoons, seperate ones for each batter, start with the cocoa batter and scoop about 1/3 cup. Drop in the middle of the tin. It will start to spread out a little - don't worry, this is a good thing. Next, take a scoop of the white batter and drop it in the center of the cocoa batter that's already sitting in the tin. Keep alternating between cocao and white batters, allowing the
batter to keep spreading and spreading outwards in the pan. If the batter is a little on the thick side, after you have all of your zebra layers in the tin you can gently shake it to help the batter cover the entire bottom of the pan.
Don't worry if the pattern isn't elegant, the end result will be unique-looking and yummy! Bake for 30-40 minutes, the top will brown quickly but be sure to test with a toothpick to ensure the center is cooked. Store in a covered container.
Per slice: 260 cals, 7g fat, 45g carbs, 12mg sodium, 2g fiber, 5g protein.  (PRO7%,CHO68%,FAT25%)